Hey, kids—let's make our own 3D viewer!When I read that a major toymaker was planning to introduce a 3D viewer for the iPhone, my first thought was "Heck, I can make one of those for a couple of bucks." Over the years I've owned just about every kind of stereo viewer made, and I know what's involved in building one: provide the ability to focus on a stereo pair, and make sure each eye only sees what it's supposed to see. That's all there is to it. 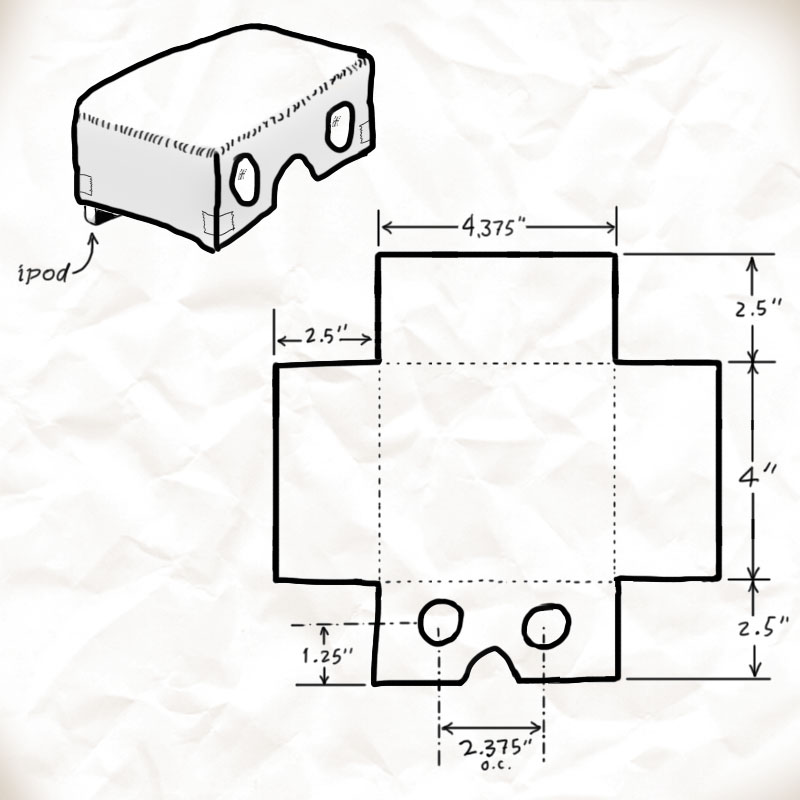
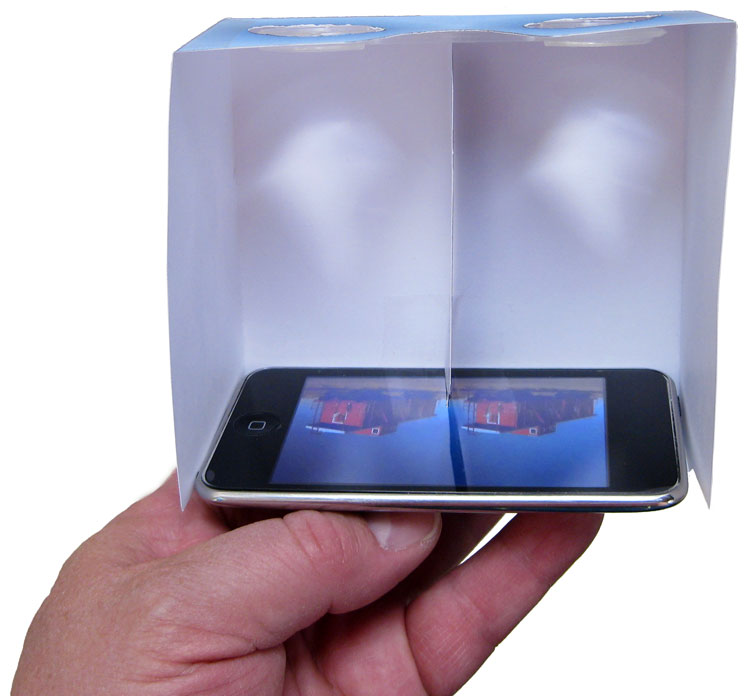
So I dug up a pair of inexpensive plastic lenses (Berezin's #507, $1.65 a pair) and designed a simple cardboard viewer to hold the lenses. First there was the obligatory napkin sketch... which actually wasn't done on a napkin—I sketched out the design in Photoshop. But I added a wrinkled paper background to make it look authentic. (Click on it for a larger view.) Then I created a paper prototype, tweaked the dimensions a bit, and made a final version in Illustrator. It's a PDF file that you can print out on card stock and tape together to make your own 3D viewer. Or you can use it as a template to build a viewer from a plastic report cover, or from card stock that's too heavy to go through your printer. Actually, there are two files: one for iPods Touch and iPhones up to version 4S, and a larger one for the iPhone 5. Note: the odd-shaped piece at upper right in the PDF template is a separator that helps keep your right eye from seeing the lefthand image and vice versa. Tape it in place in the center of the viewer, as close to the lenses as possible, leaving a 1/2" gap at the rear of the viewer so that you can insert your iPhone/iPod Touch. The separator has a cutaway in front for your nose and in back to let you slide your finger across the screen to change images. You can see the separator's position in this photo of the viewer's underside. To use the viewer, just lay your iPod Touch or iPhone against the inside back of the viewer, turn it on, and you're ready to go. 
How does it work? It's really pretty simple. You use the Photos app that's built into your iPod Touch or iPhone to display the stereo pairs you've created (any camera will do; I'll explain how in a minute), and the viewer lets you see them in glorious color 3D. It's especially impressive if you have the latest generation iPod Touch or iPhone, because its 326 pixel-per-inch Retina display shows off your photos as no other phone can. 
Taking 3D picturesYou might think a special camera is needed to take stereo photos, and certainly there have been plenty of special cameras and lenses offered in the 150+ years since stereo photography was invented. But I'll let you in on a little secret: you can use any camera to take stereo photos. The only caveat is that your subject has to be non-moving—a landscape, for example, or a still life. The technique I'm about to explain was used by the Apollo astronauts to take stereo photos on the Moon, and I figure if it's good enough for NASA, it's good enough for amateurs like us. What they did was to take a photo, shift their weight to the other foot, and take a second photo. The horizontal separation between the two shots duplicates the distance between your right and left eyes, producing slightly different photos that your brain can fuse together into a three-dimensional image. You'll want to hold the camera vertically, as for a portrait, because that's how your image is going to be cropped in order to fit in the iPhone/iPod Touch's display, side by side with its mate. Keep the camera aimed straight ahead, level and at the same elevation for both shots. You can correct for a little vertical misalignment later, but if the camera twists between the two images, that's tough to fix. 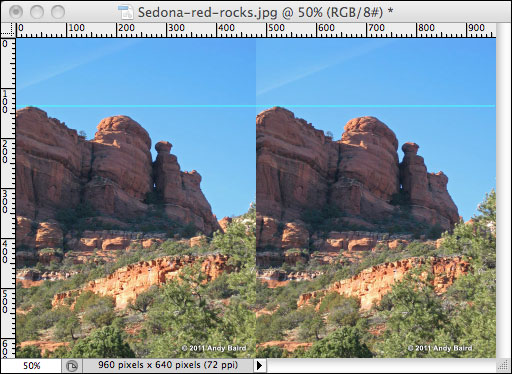
Once you have your two images in the computer, you need to get them into a 960 pixel wide by 640 pixel high document. (This size takes full advantage of the ultra-high-resolution Retina display.) Make sure you have the left image on the left and the right image on the right! To do a quick check, shrink the image to 50% on your computer screen, then hold the viewer against the screen. Don't worry if it looks coarse; it'll look much better on your iPhone or iPod Touch. Make sure the two images are vertically aligned. If your photo editing software allows it, you can pull down a guideline to check, as shown here. Or you can lay an actual ruler against the computer screen (how retro!). If you don't get this right, you'll experience eyestrain as your brain struggles to fuse misaligned images. Save the image pair in the folder you normally use to sync photos with your iPhone/iPod Touch. (If necessary, use iTunes to tell the computer to sync that folder each time the iPhone/iPod Touch is connected.) Once again, here are the links to my printable viewer patterns: iPods Touch and iPhones up to version 4S All you need is some card stock, scissors, and tape... plus the $1.65 plastic lens pair I mentioned. And to get you started, here are a few sample stereo images you can copy to your iPhone and use to try out your viewer. Have fun! |