


Redecorating the bedroom | ||
|
There's no such thing as too much insulation, especially when you're boondocking and don't have access to power for heat and air conditioning. Lazy Daze puts two inches of fiberglass into the walls of its coaches, which is about an inch and a half more than most other RV makers use. But there's always room for improvement—especially in the overcab bedroom.
When I got Gertie, her upstairs bedroom had already been improved by Gary and Judie. It still had the decorative curtains put in by the factory in front of its openable side windows and fixed front window, but Gary and Judie had covered all three windows with
But the curtains and their hardware annoyed me—they were unnecessary, not especially good looking, and when I'd roll over at night the curtain rings would clatter. I took them all out soon after getting Gertie, but the bare walls and Reflectix panels were unattractive. So I hatched a plan to cover all three walls of the "upstairs" bedroom with quilted fabric. At first I thought I'd stretch the fabric between poles, but I soon realized that that was fraught with complications, and I came up with a better idea: use the fabric as a facing on panels of 1" Styrofoam insulation. The panels would be easy to attach to the walls, and the fabric would be stretched flat across the surface of each panel. Making the panelsI found an online store selling quilted muslin in an attractive tan color that would match Gertie's brown-and-beige interior. I ordered seven yards of 45" fabric at $12.99 a yard—by far the most expensive part of this project. When I got the fabric, I was disappointed to see that it had almost no "loft"—in fact it was only about 1/16" thick, quilting and all! Good thing I hadn't relied on the fabric alone as an insulator, as I had originally planned to do. I like the way the quilted muslin looks, but at thirteen bucks a yard it's a poor value. If I were doing this project over, I'd buy an inexpensive cotton or poly broadcloth, since the fabric is really just decoration—the Styrofoam does all the work as far as insulating is concerned. 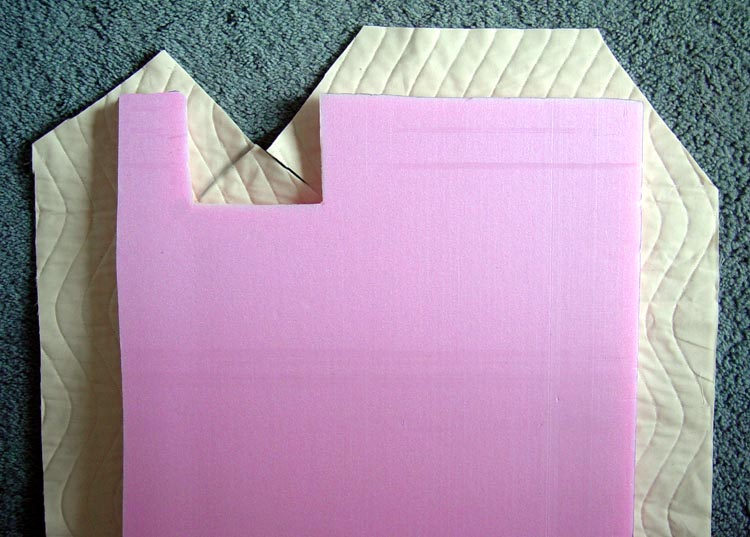
At Home Depot I bought 24" x 96" x 1" thick foam panels—conveniently close to the dimensions I needed—for a little over six bucks apiece. I measured the bedroom and cut the panels to size with a kitchen knife. (The panel shown here had to be notched at one end for the fan/light switch at the head of the bed). Then I cut the fabric about 3" oversize and wrapped it around the back, hot-glueing it in place. I don't normally find hot glue very useful, but for this project it was ideal. I dribbled it on with the glue gun, doing a foot at a time since that was all the glue I could manage to melt at one time with my cheap little gun. As soon as I'd smoothed the fabric down over the glue, I pressed it with a small iron I use for sewing, using the highest temperature and holding the iron on until the glue began to stain the fabric—then I knew I had a good even bond. (Incidentally, if you're cringing at the thought of what this did to my iron's soleplate, relax—at the end of the job, a few swipes across a scrap of fabric removed all traces of glue.) 
When I'd finished gluing the fabric to the back of each panel, I turned the panel over and steam-pressed the fabric with my good iron—partly to flatten any wrinkles, but mainly to shrink it so it would stay flat. Then I carried all three panels out to Gertie to mount them. MountingMounting was the most difficult part of the job, mainly because I had a great deal of trouble getting the Dual Lock (similar to Velcro but with four times the holding power) that I was using to adhere to the textured wallpaper. I prepped the wall with rubbing alcohol to make sure it was clean and grease-free, but I just couldn't seem to get a good bond—the large front panel kept popping off. Finally I got smart and attached the Dual Lock to the metal frames of the windows instead of to the wall. This worked fine for the side panels, but the front panel—which hangs from a 45°-angled front wall—refused to stay up. The Dual Lock adhered to the window frame all right, but it peeled off the back of the foam panel. After a lot of unsuccessful fiddling, I finally gave up and screwed the front panel in place using six 1.5" long sheet metal screws that penetrate the 1"-thick foam panel and sink 0.5" into the wall. To prevent the screwheads from going right through the soft foam, I used 1"-diameter tan buttons as washers. (I painted the screwheads a matching tan.) This secured the front panel very well, and the screws and buttons matched the tan muslin well enough that the installation still looked fairly professional. 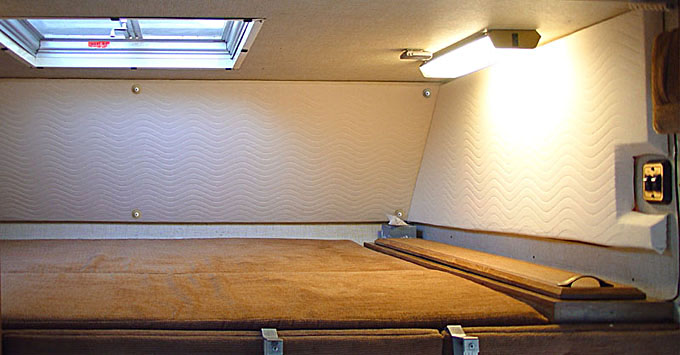
The final result was a bedroom with a clean, modern look...and an extra inch of insulation that should help make it more comfortable all year round! (This picture shows the bedroom before I replaced the featherbed and sleep sack.) The panels snap off for access to the windows, just in case I ever need to get back there (to fix a leak or whatever). Sure, you can make padded cell jokes—but I like it! Finishing touchesTo further reduce heat gain in the summer, I covered the outside of the now-unused front window with white Con-Tact film. I figured that while the heavily tinted Lazy Daze windows are fairly good at stopping heat, it would be even better not to let it reach the window in the first place. This white reflecting layer accomplishes that. (Lazy Daze rigs built since 1990 have had a phony window painted onto the front of the overcab area with black paint, a stupid design that gives you the worst of both worlds: it soaks up heat and passes it to the interior, without providing any of the benefits of a real window. If I had one of these, I'd cover up the fake window in the same way.) You may be wondering whether Con-Tact is suitable for exterior use, but I have experience with this: I once used Con-Tact to put the name and logo of a friend's lawn service company on his trucks, and it held up well for many years. I expect this to do even better, since it's white and is one large sheet instead of many small black letters. To keep the white expanse from being too boring, I added Gertie's name and likeness, which I printed out on multiple sheets of matte-finish clear self-adhesive film using my laser printer. Now Gertie is easy to recognize as she goes down the road! And to match the logo on the front, I printed a miniature version to replace the "Chevy" logo in the middle of the steering wheel hub. |
