| Miscellany: bits and pieces of interest |
Last updated 24 August 2002
| Seeing the unseeable |
Here's something in the trivial-but-interesting category:
 Did you know that the CCD image sensor in your camera is very sensitive to infrared radiation? (This is true of most camcorders as well.) Suppose your TV remote doesn't seem to be working, but you're not sure how to test it. Here's an easy way: point its business end at the QuickTake's lens (while the camera is in one of its record modes) and press any button on the remote. If the remote is working, you'll see the flickering light of its IR emitter in the QuickTake 200's LCD display! The camera is picking up the infrared radiation and converting it to a visible form for you. Cool, huh?
| What's the real difference? |
In most respects Apple's QuickTake 200 is the same as Fuji's DS-7—after all, Fuji builds the cameras for Apple. (I don't have information about Samsung's Kenox SSC-350N, but it appears to be identical to the Fuji DS-7.) But there are differences betwen the Fuji and Apple versions of this camera—some of them important:
- The most obvious difference is that the QuickTake 200 only comes with Mac software and a Mac cable, while the Fuji DS-7 comes with cables and software to connect to either a Mac or a PC. QuickTake 200 owners who want to use their cameras with PCs are not out of luck, though—you can download PC software from Fuji's website, and buy or build a PC cable. Details are on this site's Software page and Cables page.
- Another difference is software. Apple includes the QuickTime IC extensions; Camera Access software (a very nicely designed application for transferring pictures to and from the camera); Adobe's PhotoDeluxe image-retouching software; and NetCard, a program for emailing electronic "postcards" with your digital images. Fuji's software package includes their own not-so-slick image transfer software and a photo-retouching program (I'm not sure which one).
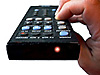
 Apple includes a clip-on optical viewfinder (pictured at right)—a good thing to have on a sunny day, when bright light can wash out the LCD display. (Fuji DS-7 owners can get one of these for about ten bucks from any Apple dealer—ask for part #922-2904.)
- If you press the QuickTake 200's Action button twice, you'll turn off the LCD's power-hungry backlight. This simple act can double your operating time on a set of batteries! But how can you take pictures if you can't see the display? Use the optical finder—another reason for QuickTake 200 owners to be grateful it's included. You should also turn off the display while you're transferring images to the computer and running on batteries (unless you really enjoy seeing the words "PC-MODE" in the middle of an empty screen). Unfortunately, Fuji didn't include this power-saving feature—a significant omission.
- Fuji includes a set of alkaline AAs and a set of NiCd batteries with a charger. Apple includes only a set of lithium batteries—good for about an hour of use. Given the appalling rate at which both these cameras eat up batteries, Fuji did right to include the rechargeables. QuickTake 200 owners will want to buy their own rechargeable batteries...see the Batteries page for details.
- Both cameras capture 640 x 480 pixel images in "fine" mode. But in low-res mode there's a difference: the QuickTake 200 still captures 640 x 480 images, but applies twice as much compression in order to make the files smaller, while the DS-7 drops to 320 x 240 resolution (this smaller area is outlined by a white rectangle visible on the LCD) to achieve the same end.
| Videoconferencing |
Thanks to the video output jack that Fuji thoughtfully included, these cameras are great little video cameras. As such they make ideal sources for videoconferencing or website cameras. But before you get excited about using your QuickTake 200 or DS-7 for videoconferencing, keep this in mind: you must have a video digitizer board or video input on your computer to do this. In other words, you can't just plug the camera into a serial port and start sending live video over the internet. (This is different from Connectix' popular QuickCam, which uses some tricks to squeeze low-resolution, low-quality video through a serial port.) QuickTake 200 owners should carefully read page 53 of their owner's manual before trying anything along these lines.
Important: When turned on, the QuickTake 200 and DS-7 send a voltage spike down the video line. This spike can damage the video input circuitry on some computers—in particular, Apple's A/V cards. So please be careful to turn the camera on first before you make any video connection!
Both the QuickTake 200 and DS-7 have an auto-shutoff feature that's designed to conserve battery power by shutting down the camera if no pictures have been taken in two minutes. Needless to say, this is a problem when using the camera for videoconferencing! But there's a way to override the auto-shutoff feature: holding down the Action button while turning on the camera will disable this feature and keep the camera running continuously until you turn it off with the power switch.
Macs like the PowerMac 7500, 8500 and Apple's various "AV" models have built-in video digitizing—but if yours doesn't, don't despair! You can add this capability for under $300 with video input boards like ATI's Xclaim VR or Iomega's Buz board. If your Mac has USB ports, there are several USB video input adapters available, most in the $100-$125 range. PowerBook owners have it a little tougher, but you can still add video input to recent PowerBooks (2400, 3400 and G3 models) with a PCMCIA card made by iREZ Research (612-939-9299). Their CapSure PC Card is a 30 fps video digitizer with both composite video and S-video inputs. The card is available from PC/MacConnection and from Cyberian Outpost for around $130. Pretty affordable for what it does!
G3 Mac owners have a few quirks to deal with, as Scott Franken relates: "I have a G3/233 minitower with the optional AV input card. I tried connecting the video out from the QuickTake 200 to the composite video in on the computer. It works fairly well, although the color is not the greatest. I had a bit of a problem with the video resolution at first. You have to set the QuickTake software to the smaller res to accommodate the 320 x 240 limitation of the G3 AV card. I did find a workaround on MacFixit.com, wherein you open the System file with ResEdit and find PICT resource id -16610 (?). Then you paste a few pixels of pure blue into the resource. I don't know why, but this seems to work. Now I can capture video at the full 640 x 480 resolution of the camera."
| Website cameras |
If you're interested in setting up a website camera—one that transmits live (or at least regularly updated) pictures over the web—there are several ways to do it. First, of course, you must have a video input on your computer. (For details, see the section on videoconferencing, above.)
Important: When turned on, the QuickTake 200 and DS-7 send a voltage spike down the video line. This spike can damage the video input circuitry on some computers—in particular, Apple's A/V cards. So please be careful to turn the camera on first before you make any video connection!
But you don't have to be running your own server to have a webcam. Several software packages can automatocally upload images to a remote webserver via FTP—just as you do when updating your web pages on your ISP's server. My favorite is CoolCam, which offers quite elaborate features and an elegant interface in a $20 shareware program. For those with simpler tastes, there's StripCam, a simple (freeware!) webcam utility that lives in the Mac's control strip, can either be used with a server running on your Mac or can automatically send image files to a remote server via FTP (built in).
PC users needn't feel left out (though they will have to pay a bit more)—Bob Prangnell's EZ-AutoCam offers a variety of useful features including the ability to set up a webcam using the program's built-in FTP client. It's $29.95 (introductory price), and a downloadable demo version is available on Bob's website.
| A color photo printer for a hundred bucks |
Color inkjet printers like the widely acclaimed Epson Stylus Photo series have dropped to below the $100 mark, and when used with high-quality paper they can turn out prints that are literally impossible to tell from traditional photos. Of course, with the QuickTake 200's modest pixel count, you won't be getting tack-sharp 8x10's no matter how good your printer is—3" x 4" is more realistic. But if you buy a good printer like Epson's Stylus Photo 780 ($99 list), it will work with your next digital camera as well...so it's a good investment. Epson has held a commanding lead in photo quality output for several years now, and H-P and others, good as they are, have never managed to catch up. But be sure you buy a Stylus Photo printer—Epson also makes a Stylus Color series that's fine for general use, but no match for the Stylus Photo printers when it comes to photos. The difference? The SC series has just four ink colors, but the SP printers have six. That allows dot-free shadings and gradients, making possible a true photographic-quality print.
| Exposure compensation |
The QuickTake 200 and DS-7 are pretty much automatic when it comes to exposure. You can set the aperture to either f/2.2 or f/8, but no matter what you do, the camera will make its own judgment about what exposure to use. This can be a problem when shooting backlit subjects such as a skier on the slopes: the camera will expose for the whole image area, and your skier will end up a black blob on a gray background.
But all is not lost! It turns out there is a way to trick the camera into using more or less exposure, though its designers didn't intend you to. Reader Jerry Farm has written an excellent description of how to do it, and has posted it on his "Exposure Compensation for the QuickTake 200" web page along with sample images showing how you can take advantage of this trick to get better control over your pictures. Check out Jerry's page, and add this great technique to your bag of tricks!
| Fiddling with the focus |
Maybe you've already figured this out, but just in case you haven't: you aren't limited to just the three marked focus settings (3.5"-5", 18"-35" and 35" to infinity). You can set the focus lever in between the clickstops if you need to focus at, say, 12". Just remember that poor focus is the number two reason for blurred pictures (camera shake is number one), so don't forget and leave the lever set to the wrong distance for subsequent pictures!
Here's another good tip from Jerry Farm. This is his recipe for perfectly focused closeups:
1) Set the aperture to open (f/2.2).
2) Adjust the focus selector to get the sharpest image on the LCD. Usually this requires setting the selector between click stops.
3) Set the aperture to closed (f/8) if required for proper exposure, or use Jerry's exposure compensation trick (see above)
4) Snap a perfectly focused picture.
What's going on:
This trick exploits the reduced depth-of-field of the open aperture compared to the closed aperture. A smaller depth-of-field makes the effects of focusing changes easier to see in the LCD, allowing you to set the focus more accurately.
| QuickTake manuals online |
Have you lost your camera's manual? OK, have you temporarily...uh...misplaced your manual? (One reader tells me his dog ate his manual—no kidding!) No sweat. Apple, in an unusually intelligent move, has put most of their product documentation online in PDF format. You can find manuals for all the QuickTake cameras at Apple's QuickTake Manuals Page.
In addition, there's a good online course, "How to Use an Apple QuickTake 200," that will get you started in a hurry if you don't have time to read the whole manual right now. It's simple, clear and well written. Check it out!
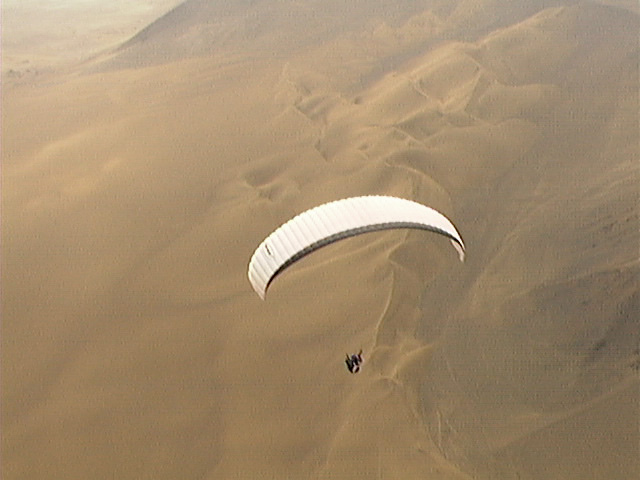
| Aerial photography |
Proving the QuickTake 200's versatility, paragliding enthusiast Niccolo Martelli took this beautiful shot. The photo shows fellow paraglider Andy Heiremans in transit between Patillos and Iquique, Chile. (Click the small picture to see a full-sized version.)
 Return to the QuickTake 200/Fuji DS-7 Users' Page
If you have tips or suggestions about either of these two cameras, or if you've found any accessories I haven't mentioned here, send email to Andy Baird so I can put the information on this page.