| Lighting: how to survive without a flash |
Last updated 23 December 1999
The two most common complaints about the QuickTake 200 and Fuji DS-7 are that they eat batteries, and that they have no flash. I deal with the battery issue on the Battery page; here I'll talk about how to get along without a flash. Aside from the fact that we have no choice, there are actually good reasons not to use a flash. The typical shapshot taken with a camera that has built-in flash suffers from flat, unnatural lighting, harsh shadows—and of course redeye. All of these unflattering effects are the result of putting the flash on the camera right next to the lens. Professional photographers almost never light a photo this way (unless they're deliberately trying to imitate a snapshot). With a little effort we can follow their example and get much better looking pictures.
| Steady as she goes |
These cameras are rated at ISO 100, which means they are not particularly sensitive to light. Nevertheless you can get surprisingly good images in low-light situations—in fact, I've taken pictures indoors when the light was so dim that I couldn't see anything in the LCD display, yet I got good exposures. How is this possible? Well, the QuickTake 200/DS-7 automatically adjusts its shutter speed to get the best exposure, and the range of speeds is from 1/4 second to 1/5000. A quarter of a second lets in a lot of light—if you can keep the camera (and the subject!) still long enough. Many years ago as a professional photographer I learned to shoot in available light with far less sensitive media (like Kodachrome at ISO 25!) by using slow shutter speeds and doing the following:
- Lean or brace yourself against anything you can find.
- Pull in your elbows and if possible brace the camera against your face.
- Slowly exhale, and when all your breath is out,
- Slowly squeeze the shutter release.
Practice this technique until you have it down pat, and you'll be surprised at how it improves your indoor pictures.
| Putting pods to work |
Now if you've had one capuccino too many, even good handholding technique may not be enough. That's where you need some serious steadying help. Everybody knows about tripods, of course. They work well, but a tripod is a clumsy thing to carry around with you. You might also want to consider a monopod, which is a single telescoping leg that collapses to a foot or two in length—easier to carry than a tripod, but still much too large to tuck into a pocket. Here are some more portable alternatives that can get you good shots in low light.

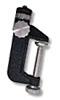
Above right is a clamp-pod, a handy little device that combines a swiveling head (with tripod screw) with a C-clamp body. You can attach it to a car window, a door, a table top—anything two inches thick or less. Clamp-pods are cheap (I paid $15 for the one shown here) and can be carried around in your pocket or your camera case.
Another compact, inexpensive steadying device is the tabletop tripod. This one, like most, folds into a compact 6"-long bundle and flips open to form a sturdy little stand that's not just good for picture taking—it's also essential if you're planning to use your camera for videoconferencing. There are lots of different models available, but all are compact and most are inexpensive (this one cost $20). Check your local camera shop for these—and bear in mind that they are not just for use on tables. Many's the time I've gotten a low-light shot by bracing my tabletop tripod sideways against a door or wall! Porter's Camera Store (800-553-2001) has a sweet little Solidex tabletop tripod for $9.95. In fact, Porter's is an excellent place to look for all kinds of accessories like clamp-pods, monopods, tripods and video lights (see below).
| Supplementary lighting |
OK, what if you really just need more light? After all, it doesn't matter how steady the camera is if you're trying to shoot a hyperactive toddler! Well, unfortunately there's just no way to use a flash with the QuickTake 200/Fuji DS-7. I've even talked with electrical engineers about the possibility of hacking into the camera's shutter circuits to get a signal that could trigger an external flash,
 but apparently the way the camera measures exposure would make this unworkable—even if you could do it, all your flash pictures would be washed out, because there's no way the camera could be told to make allowances for the extra light source.
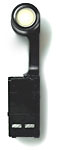
There is a way to use an external light source, however: get yourself an inexpensive battery-powered camcorder light like the one shown here. Because it's not built into the camera, you can bounce it off the ceiling or walls for a much more natural look than you'd get with built-in flash. (No redeye, either!) And because you only turn it on when you need it, even a small battery will last quite awhile. Radio Shack has a compact camcorder light (#16-2030, $29.99 without battery) that will do the trick nicely. The light shown here is an Ambico "Video Bracket Light" that I picked up at a yard sale for $15, coupled with a Sony NP-55H rechargeable battery—the smallest and least expensive made, but just fine for this kind of intermittent use.
I usually handhold my light (and in fact I don't have much choice, since the one I have, like the Radio Shack light, has no tripod or hotshoe fixtures)—but if you're looking for an all-in-one solution, a $15 camera/light bracket from your local camera store (or the camcorder accessories section of an electronics discounter like Best Buys) will let you mount a camcorder light to the camera by using its tripod socket. Put the light in the bracket's accessory shoe, and you have a convenient one-handed shooting setup.
Where can you get battery-powered camcorder lights? One good place to try is Porter's Camera Store (800-553-2001), a mail-order dealer that's been around at least since the late Sixties and which carries a huge range of photo and video accessories. In their Summer '97 video accessory catalog I see five different battery-powered camcorder lights, ranging from $14.95 (!) to $29.95. The latter unit is a shoe-mount Sima model with a tilting head, which looks ideal for bracket mounting. (Needless to say, you can also find your choice of camera brackets at Porter's.) Their website doesn't list everything, so your best bet is to call and ask for a catalog.
Todd Earnhardt found a good light and bracket combination at Best Buys: Sima's SVB-1 video bracket ($11.99) mates nicely with the Sima SL-7 video light ($34.99). The light includes a battery and charger, and has a 20W quartz-iodine bulb—plenty bright for QuickTake snapshots!
| Available moonlight |
Hey, who says you need a light to shoot at night? Ken Spencer got this spectacular image (shown reduced) with his brand-new QuickTake 200 the first night he had it...by mating the camera to the eyepiece of his homebuilt 6" reflecting telescope. Ken says his main problem in getting the shot was that the moon was too bright—he had to use a polarizing filter to cut down the amount of light. Nice work!

 Return to the QuickTake 200/Fuji DS-7 Users' Page
If you have tips or suggestions about either of these two cameras, or if you've found any accessories I haven't mentioned here, send email to Andy Baird so I can put the information on this page.